Material-wise, they are made of synthetic resin using [Resin Casting (https://en.wikipedia.org/wiki/Resin_casting)]. Although widely used in plastic models, this technology has its limits and we usually don't expect Apple quality. I'll do my best to check every piece, but there could still be small, hidden defects I over-looked, like cracking, size differences, and bubble hollows. These small defects can be easily fixed with the right tools.
Some kits come with eye stickers and other extra stuff.
How to build a Garage Kit model.
This is a stripped-down description of how a Garage Kit model is built. For detailed instructions, I've prepared a tutorial here: GKbeginner
キットを購入したら、組み立て説明書と照らし合わせて、部品に不足がないかよく確認して下さい。足りない部品があった場合は、説明書に記載されている連絡先にお知らせ下さい。ただし、販売終了しているキットや、組み立てを始めてしまった物については、対応できない場合もあります。
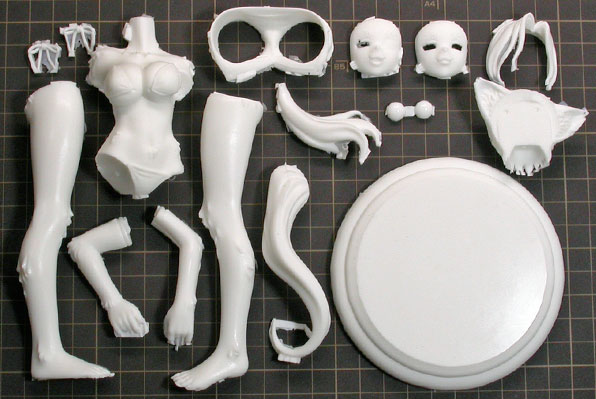
1)Checking the parts
When you receive your garage kit, the first thing to do is to use the included instruction pamphlet (manual) to check if you have all the parts. Should there be anything missing, please contact me using the address printed on the instruction for supplement, BEFORE YOU START BUILDING THE KIT. If your kit was out-of-production, or you contacted me after you started building the kit, I might not be able to fulfill your request.
部品には離型剤が付着しているので、専用のクリーナーか台所用中性洗剤などで洗浄して下さい。タワシや古歯ブラシなどでゴシゴシ洗いましょう。
2) Cleaning the parts
Chemicals known as メrelease agentモ are used to get the parts off the molds. These are no good for the building process and must be washed off using neutral detergent with a soft scrubbing brush (used soft toothbrush works too). Clean up the leftovers thoroughly.
部品は単に接着するだけでは強度不足です。必ずドリルで穴を開け、アルミ線や真鍮線などの金属線を入れて、補強しながら組み立てて下さい。
3) Wiring
Before using instant adhesive to put the parts together, you MUST first drill holes in the parts and connect them with aluminium or copper wires. Adhesive alone is not strong enough to hold them together.
業者成型のキットには気泡はほとんどありませんが、手流しの場合はいくつか残っています。これらはパテなどを使って埋めて下さい。埋めた跡はきれいに整形して、分からないようにしましょう
4) Filling-up the bubble holes
In rare cases, air can be trapped in the casting process and leave holes in the parts. You can fill them up with putty. If you did the filling properly, they won't be noticed after painting.
キットの部品には、ゴム型を合わせた時に出来るパーティングラインが存在します。これも不要な物ですので、ヤスリがけやパテ埋めで消しましょう。この時点で接着できる部品は接着し、その合わせ目も消しておきます。接着には瞬間接着剤が使えます。
5) Polishing-up parting lines and seams
Since the parts are made by casting, a thin extruded line can be observed where both sides of the mold met. You may get rid of them using a file or sandpapers. Some parts should be assembled before painting. Fill up the seams between those parts with putty.
塗料の定着をよくするために、レジンキット用のサーフェイサーを塗ります。筆塗りではなく、エアブラシや缶スプレータイプの物を使って、吹き付け塗装することをすすめます。この時点で傷が見つかったら、またパテ埋め・ヤスリがけを繰り返して、きれいになるまで磨きましょう。
6) Underpainting
Check the surface carefully, patiently handle all the roughness until the surface is perfectly polished. Use surfacer for garage kit to do a undercoat for the surface. This allows real paint to stay firmly. Apply surfacer with an airbrush or use spray-can type ones. Do not apply them with a brush.
塗装には各種模型用途料が使えます。工夫を凝らして、美しく塗装して下さい。
7) Painting
There are many choices for paints. Learn the basics and practice your painting skills. Make sure you paint it clean and beautifully.
塗装が終わったら、すべての部品を接着して完成させます。強度が必要な場所の接着には、エポキシ系接着剤の使用をすすめます。これで完成です。好きな所に飾りましょう!
8) Final assembly
When the painting is done, put everything together using adhesives. Epoxy-type adhesive is recommended where stronger bonding is needed.